31187a - Progress Challenge 05
By Colleen Sedgwick
Proofing and pre-press
This progress challenge requires you to share the proofing
and pre-press processes you observed in finalising your publications. You are
required to submit the following:
1. One screen shot of the PDF colour output settings you
used in exporting your master PDF for your brochure.
2. One screen shot of the PDF colour output settings you
used in exporting your master PDF for your travel guide.
3. A brief written report explaining the steps you took in
ensuring that the master PDFs of your publications would be suitable and
acceptable to printing facilities.
TIP: Navigate to the student forum to engage in the
discussion with your peers.
Answer
Part 1 – PDF Colour Output Settings (brochure)
(These are currently unavailable in JPEG format)
Part 2 – PDF Colour Output Settings (travel guide)
(These are currently unavailable in JPEG format)
Part 3 – Proofing
Proofs[1]
Preparing for print
Pre-press basics
Understand
pre-press and the processes involved in preparing designs and documents for
professional printing by reading pages 233–235 in your textbook, Graphic
Design: Australian Style Manual.
- I have exported these documents to PDF format and taken the screenshots as shown in Parts 1 and 2.
- The PDF copies also include colour bars and crop marks so the printer knows what to do when printing it out.
- (These are currently unavailable in JPEG format)
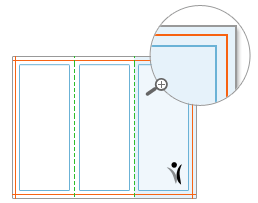
- The diagrams below show crop and bleed lines for proofing (c/o Vistaprint).
[1] Barnum et al: ‘Chapter 6 – Pre-press
and Print’ in Graphic Design:
Australian Style Manual, pages 233–235;


Comments
Post a Comment
Thank you for your feedback. The moderator will soon moderate your comments and say 'yay' or 'nay'. Any posts that aren't relevant to the topic of this blog will be rejected immediately.